Expressive E’s Osmose isn’t just another synthesizer—it’s a flagship for MPE expressivity, and this official tutorial shows how to harness its full potential inside Ableton Live 11 and 12. The video walks through every step, from physical connections to nuanced MIDI and audio routing, making it clear that Osmose is designed for both standalone sonic exploration and deep DAW integration. With a focus on workflow, the tutorial demonstrates how to record, edit, and maximize Osmose’s unique performance data, while also revealing how it can serve as a powerful MPE controller for your favorite plugins. If you’re serious about expressive digital synthesis and want a practical, architecture-focused guide to working with Osmose in Ableton, this is essential viewing.
29. November 2024
LYRA
Expressive E Osmose Meets Ableton Live: A Deep Dive into MPE Integration
Osmose and Ableton: A Match Made for Expressivity
The video opens with a clear mission: to preserve all of Osmose’s expressive capabilities when integrating it with Ableton Live, whether you’re using its internal EaganMatrix sound engine or controlling external plugins. Expressive E positions Osmose as a versatile instrument, not just a synthesizer, with a focus on MPE (MIDI Polyphonic Expression) as the backbone for nuanced performance. This isn’t just about plugging in and playing; it’s about ensuring every gesture and subtlety translates into your DAW workflow.
From the outset, the tutorial sets expectations for both simplicity and depth. There’s a straightforward setup for those who want quick results, but also a more comprehensive approach for users who crave a practical, robust integration. The emphasis on MPE support in Ableton Live 11 and above signals that this is a modern workflow, designed for musicians who demand both immediacy and detailed control over their sound.
"The goal is to maintain all of Osmose's expressivity both when using its internal Egan Matrix sound engine and when controlling our favorite plugins."
© Screenshot/Quote: Expressivee (YouTube)
Wiring Up: Audio and MIDI Setup Demystified
"It's the most convenient way of using hardware in Live because it allows monitoring the audio from external gear without creating an extra audio track."
© Screenshot/Quote: Expressivee (YouTube)
The tutorial dives into the physical setup, emphasizing the importance of connecting Osmose’s stereo outputs to two adjacent inputs on your audio interface. Balanced cables are recommended for longer runs or environments with potential interference, reflecting a thoughtful approach to signal integrity. The video notes Osmose’s relatively quiet output, advising users to compensate with input gain on their interface—a practical detail that’s often overlooked in synth tutorials.
Once the hardware is connected, the focus shifts to Ableton’s audio configuration. The presenter demonstrates how to select the correct audio device, configure stereo inputs, and create a dedicated audio track for Osmose. Renaming tracks for clarity is encouraged—a small but significant workflow tip that pays dividends in complex projects.
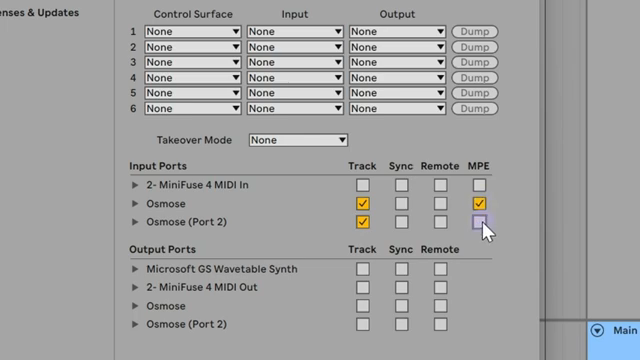
The setup doesn’t stop at audio. The video methodically explains how to connect Osmose via USB for MIDI, ensuring that both audio and MIDI data flow seamlessly into Ableton. Special attention is given to selecting the correct MIDI ports and enabling MPE, as well as configuring Osmose’s internal settings for optimal DAW integration. This section is a model of clarity, balancing technical detail with step-by-step guidance.
Audio, MIDI, and MPE: Unlocking Expressive Workflows
With the connections established, the video explores the practicalities of recording Osmose in Ableton. Recording audio is straightforward, but the presenter is quick to point out its limitations: while you capture the full sonic quality, you lose the ability to deeply edit performance nuances—much like printing a document instead of keeping it editable.
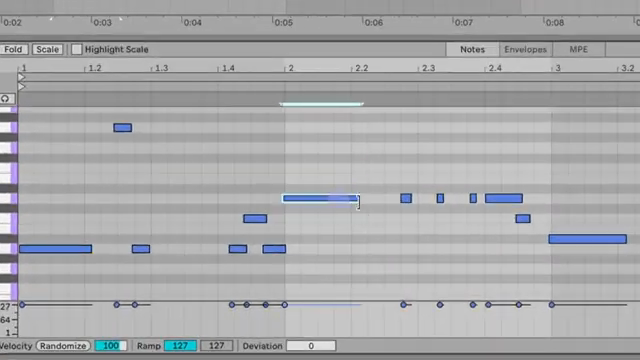
The real power emerges when integrating MIDI. By routing Osmose as an external instrument, users can record not just notes, but the full spectrum of MPE data—continuous pressure, aftertouch, and per-note pitch modulation. This enables detailed editing of each note’s expressive parameters within Ableton’s MIDI editor, bridging the gap between live performance and post-production flexibility.
The tutorial doesn’t shy away from quirks: for example, Osmose’s internal engine ignores MIDI velocity, relying instead on continuous pressure for articulation. The presenter also clarifies how Ableton maps MPE parameters, noting that aftertouch from Osmose appears as “MPE Slide” in Live. These details are crucial for anyone aiming to fully exploit Osmose’s expressive range in a DAW environment.
"But we've also recorded all the expressiveness delivered by Osmose."
© Screenshot/Quote: Expressivee (YouTube)
Osmose as Synth and MPE Controller: Layered Possibilities
"Although Osmose is download compatible with legacy MIDI and can be used with any virtual instrument its expressive capabilities can only be fully exploited when the plugin you control supports MPE."
© Screenshot/Quote: Expressivee (YouTube)
The video moves beyond single-instrument workflows, showing how Osmose can function both as a standalone synthesizer and as a sophisticated MPE controller for plugins. Switching Osmose to external MIDI mode allows users to bypass its internal engine and drive any MPE-compatible software instrument in Ableton. The tutorial demonstrates this with Synapse Audio’s The Legend Hans Zimmer, highlighting the importance of enabling MPE in both Ableton and the plugin itself.
This duality—internal sound engine and external controller—opens up layered creative possibilities. The presenter underscores that while Osmose is backward-compatible with standard MIDI, its true potential is unlocked with MPE-aware plugins. The workflow is flexible: record expressive performances, edit them in detail, and route them to either hardware or software sound sources, all within a unified Ableton session.
Workflow Hacks: Templates and the MPE Arpeggiator
To round out the tutorial, Expressive E shares practical tips for maximizing productivity. The built-in MPE arpeggiator is a standout feature, and the video explains how to sync its tempo with Ableton Live via MIDI clock. This ensures tight timing when layering arpeggiated sequences with DAW-based tracks, though the presenter notes that MIDI clock transmits only tempo—not transport commands—so manual timing is still required for perfect grid alignment.
Finally, the tutorial advocates saving your configured tracks as project templates. This simple habit streamlines future sessions, letting you import a fully prepped Osmose setup into any Ableton project. It’s a fitting conclusion for a workflow-focused guide, emphasizing not just technical integration but long-term creative efficiency.
Watch on YouTube:
Latest articles
Watch on YouTube:
https://www.youtube.com/ExpressiveE
Links from ExpressiveE:
Sponsored links:
If you purchase via these links, we may earn a small commission – at no extra cost to you. The link opens an Amazon keyword search, and results may vary depending on availability.
🔗 Check price on Amazon